In this space, I will be detailing how I use an amp modeler rig (as described here) for live playing. In my case, the modeler in question is the Digidesign/Avid Eleven Rack, but you can of course translate most of the thinking to other setups as well. As the Eleven Rack is starting to become a little long in the tooth, and seems to be all but abandoned by Avid, I have at times toyed around with the idea of buying a Headrush or Line6 Helix. So far, it hasn’t happened – the venerable orange box still does what I need it to do, after all. But if that happens, I would definitely use these lessons learned from the Eleven Rack as a starting point when setting up the new modeler. And so can you 🙂
The setup
For live gigs, I use:
- the Eleven Rack
- a MIDI controller that has Instant access buttons (in my case, a Voodoo Lab Ground Control Pro and a pair of Roland EV-5 expression pedals)
- a full-range powered PA speaker (in my case, a HK Audio Premium PR:O 10XA)
The main PA is fed from the Main outputs on the Eleven Rack (balanced XLR outputs), while my monitor gets its signal from one of the ”output to amp” jacks (set to ”Rig output”). In the 11R, you can set the front-panel volume control to affect only the ”output to amp” jacks, so I can set and adjust my stage level independently of the signal being fed to the PA.
Balancing levels
This is quite important – having huge volume jumps when you change patches will quickly drive the soundman (and probably the audience too) nuts. I set my 11R up so the ”Rig volume” setting stays the same on all patches. It’s currently set at -6dB, but you could just as well set it to -10 or -15dB if you want, to leave a little more wiggle room in the mixer (the XLR outputs on the 11R carry a proper, true, line-level signal). Either way, make sure you stick to that setting and never change it, unless you’re prepared to make that change on all patches. Any volume adjustments to level-match patches are then made using the ”Amp Out” control (not to be confused with the ”Out to Amp” controls). That way, any volume adjustments I make to a specific patch will be the same both in the monitor and through the PA.
To get a reference, I set up a basic clean-ish Fender Twin Reverb and adjusted its ”Amp Out” control to 0dB. Whenever I make a new rig, I can always go back to that basic clean sound to help me find the right volume setting for the new rig.
Also, as mentioned earlier, the XLR outputs do carry a proper line level signal. This is normally a good thing – padding it down to mic level just to re-amplify it back up to line level in the mixer’s mic preamp will inevitably result in more noise. But while it helps in the noise department, a signal that hot can be too much for some mixers to handle through the regular mic inputs. If the mixer doesn’t have a ”pad” switch to help out, there’s often a 1/4″ TRS line input you can use instead of the XLR. For that purpose, I always keep an XLR->1/4″ TRS converter handy, just in case the soundman doesn’t have one available. In general, though, it’s not a problem, and any soundman worth his/her salt will know what to do with a hot line signal, and will also carry whatever tools needed for the job. Case in point – so far, I haven’t had to whip out the converter cable. But it feels good to know I can, if need be.
Instant access?
With a regular MIDI controller, you can only recall presets. But I am used to having a bunch of pedals at my feet, and at my disposal at any time. For instance, I can get the clean sound with or without compression, phaser, chorus, tremolo and delay. I tried calculating the number of presets I’d need to replicate the same basic amp/cab setup with those five effects being on/off in different combinations, but I lost count…
With instant access, I can preset the basic clean rig with only the effects I want on at the start turned on. The IA buttons on the pedalboard will then let me turn additional effects on (or off, if it’s something that was programmed ”on” in the preset) on the fly. Hitting the preset button will instantly get me back to where I started, or to any other preset I want to call up.
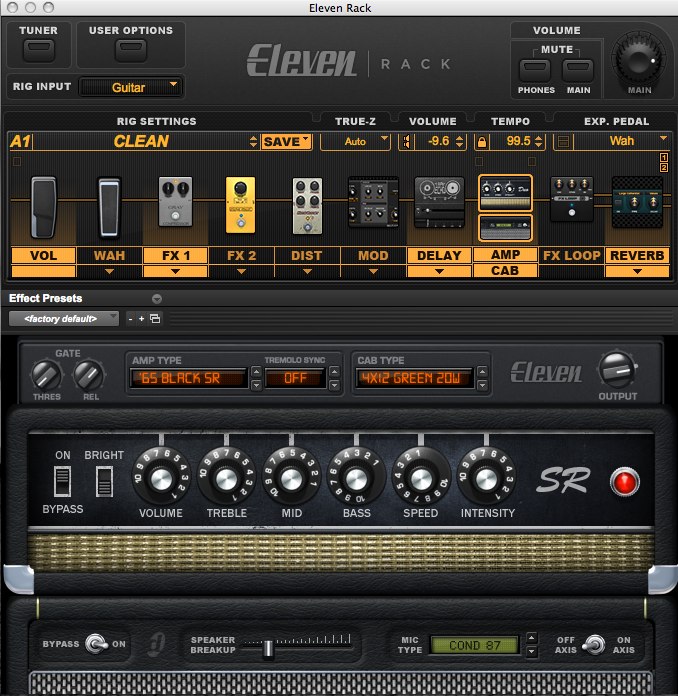
To the right, you can see a basic clean preset I’ve cobbled together. I actually did most of the work right on the 11R (it is that user-friendly!), but thought it’d look nicer to take a screen shot of the editor in ProTools. As you can see (at least if you click the image to view it in proper size), it is a Super Reverb amp model with a 4×12″ cab. There’s a compressor, phaser, overdrive, chorus and tape echo in front of the ”amp”, followed by reverb. The compressor, delay and reverb is on at the start, while the other effects can be kicked in at will.
This type of setup lets me get away with just a few preset rigs, and still get much more flexibility than my current pedalboard/amp setup.
Choosing a cab
The Eleven Rack – like most modellers out there – comes with a multitude of simulated speaker cabinets to ”plug” your equally simulated amp into. And you can set the unit up so that when you select an amp, it automatically also selects the most appropriate cabinet for it (so a Twin Reverb comes with an open back 2×12″ while a Plexi Marshall comes with a closed back 4×12″ with Celestion Greenbacks). Don’t be afraid to go outside the box – in the example above, I used a Super Reverb with a 4×12″, for instance. However, for live use, I did find the 4×12″ cabs a bit too much, so I switched to a closed back 2×12″ instead – it has a similar vibe, but a more focused sound.
Actually, I use that cab for almost all sounds when playing live, which ties in to what I said earlier about setting the levels. You can easily deal with volume changes between patches when you’re recording, but for live playing, getting the volumes just right is essential. Likewise, I found that the jump from a closed back 4×12″ to an open back 2×12″ or 1×12″ when switching from a Marshall to a Twin or Deluxe Reverb also made for a too big change in a live mix. I find it much easier to go with one cab for all the basic rigs – sometimes, I’ll use a different cab as a speciality thing (if I’m going for the Neil Young ”about to explode” tweed Deluxe sound, for instance). But my basic clean, grit, crunch and lead sounds all use the same cab and mike. And since I felt the 4x12s – while sounding awesome in isolation – were just too fat for a live mix, I ended up with a simulated Bogner 2×12″ with Vintage 30s. Using the same cab for almost all tones really helps the rig ”sit” just so, and stay consistently there, in the live mix. Again, for studio and recording work, I’ll happily experiment wildly. But those finer nuances rarely transfer to the live setting – I find that there it is better to provide a more consistent sound.
Going mono
Yes, you read right. Despite the nice stereo effects the modeler has to offer (especially with the Expansion Pack installed), for live playing I use it in mono. The main reason is not to avoid having to cart around (not to mention pay for) a second powered monitor, or to save a channel in the mixer, but rather to make the guitar easier to fit into the mix. The problem with stereo is that while it may sound nice where I stand, in the sweet spot between my powered monitors (or in my in-ears), it is a very hard signal to position in the overall mix’ stereo field. You will inevitably end up with the core guitar signal in the center, where it will be competing with the vocals. Running the rig in mono makes it easier for the sound engineer to pan the guitar and place it where it should be in relation to the other instruments. Much better! And besides, it’s not like I need to use stereo reverb to place the guitar in a virtual room – I will be playing in a real room, after all… 🙂
One tip when going mono… don’t switch the rig over to ”mono” mode. You can do that if you want, but any stereo fx present will sound strange due to phase cancellations. It’s better to just use the L or R output, and obviously stay away from too wide stereo fx (like ping-pong delays etc), as they will not be reproduced correctly. That tip goes for just about any stereo signal, by the way – summing to mono is almost always a bad idea. And if you do use stereo (be it a guitar rig or keyboard), make sure the sound engineer doesn’t feed both channels back to the same stage monitor – again, that will cause weird phase cancellations. You can feed the L side to one of the AUX sends and the R side to another, but don’t be tempted to feed both sides through the same system.
Side note: this is something I’ve found essential with my Nord Piano 2 – when using both outputs, the piano samples absolutely have to be panned fully L/R, otherwise the piano will sound strange. And of course, in live situations, care needs to be taken to never send both channels to the same stage monitor.
What about the reverb, then?
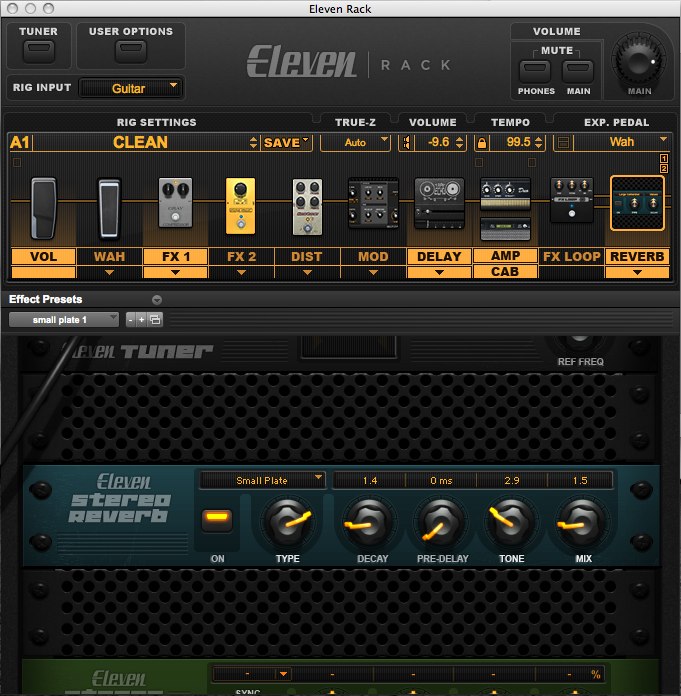
Sharp-eyed readers may remember that in the preset rig presented above, I did have the reverb on. So how does that tie into what I just wrote, one might ask? Well, again, I’m not after a large room simulation – having double rooms (one simulated in the modeler, and a real one at the venue) is one of the reasons many people get lost in the mix when trying to use modelers live. And it’s a double problem: using too much fx in general not only causes you to get lost in the mix – you’ll also eat up valuable sonic space (that would have been used by other instruments), messing up the whole mix in the process.
I still use a splash of reverb nonetheless, but only enough to get a little ”air” around the guitar. You can see the basic settings to the right – in this case, it’s a small plate reverb with quite short decay and the mix just above ”barely audible” 🙂 With the clean sound, I’ve also had good times using the spring reverb model in the 11R – again set quite short and with the mix low, it really adds to that ”Fender amp” sound and feel.
Boosting for solos
We’ve all been there – launched into a great solo, only to discover that the sound engineer wasn’t ready for it, and only halfway through the solo gets the level right. I’ve always kept a boost pedal on my pedalboards (after any distortion pedals) for that reason – that way, I can boost my own level so I know I’ll get heard. With the 11R, you could of course just set up a different preset with the level raised, but that would go against the whole philosophy of having instant access to a boost. Here are a few ways to achieve a solo boost:
Set up an expression pedal as a main volume pedal. Then simply leave it at 75-80% for normal playing, and step on the pedal when you need more volume. That’s the way we used to do it back in the ”big rack” days – I simply had a snake cable coming out of the rack to patch in a stereo volume pedal right before the power amp. I like this method because it is fluid and lets you tailor the amount of boost to each situation. But there are other ways…
Use an effects block to boost – this one is also real simple. Add a graphic EQ after the amp/cab block, and use it to raise the level the desired amount. Using instant access, you can then turn it on/off at will.
Another way is to use the FX loop as a booster – if you’re not using the FX loop for anything else, you can set it up to boost the signal. Set it to mono mode, insert a cable in the left/mono send/return jacks. Then set the mix to 100% and adjust the return level to taste. Again, using instant access you can switch the FX loop on at will to get some boost. The downside to this trick is that the signal will have to pass through additional converters (first to analog, then back to digital), with increased latency, which you may find detrimental to the feel. Personally, I hate it when the latency shifts suddenly – I can get used to a fixed (reasonable) amount of latency, but I simply cannot stand having it change as I kick stuff in/out of the chain. So using the fx loop is a no-go for me. Which leads me to the last way to boost for solos, which is how I do it:
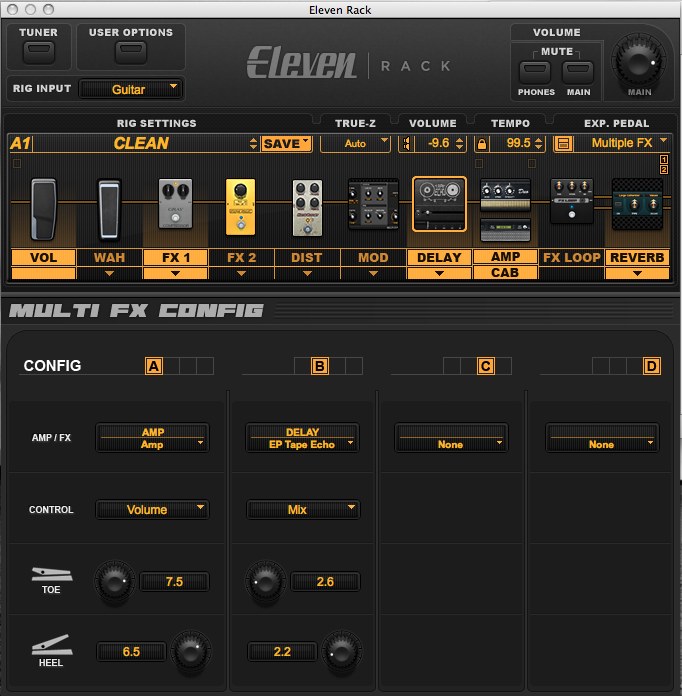
Use Multi-FX control with an expression pedal. This is a really neat trick in the 11R. You can use an expression pedal to seamlessly go from your base settings in any given rig, to an alternate setting (in this case one better suited to lead playing). and with Multi-FX control, you can adjust up to four parameters simultaneously, on the fly. To the right, you can see one setting, where I’ve made the expression pedal raise the amp’s output level and the delay mix. As a baseline, I set the ”heel” value to the numbers already programmed, but on some presets I actually have it a bit lower than the programmed normal value. That way, I get the normal level as soon as I go to that preset, while the expression pedal lets me turn the level both up or down to suit the moment. Hitting any other preset (or the one I was on) brings the settings back to their programmed values, regardless of how the expression pedal is set.
Do’s and dont’s
Don’t make presets using headphones. It will sound very different from the PA sound, and you’ll (again) get lost in the mix. With headphones, we tend to dial in smoother sounds (because it sounds nicer when we’re playing alone) and use too much effects. It’s related to the stereo vs mono thing – running in stereo means creating your own soundstage, when in reality you want to slot the guitar into the overall soundstage (containing all the instruments, vocals etc). It’s the same thing with headphones! They make you want to create a complete sound – a tone that fills the left/right spectrum and works on its own – when it reality you should create just one piece of the pie 🙂
Don’t expect settings that worked great in the studio to translate directly to a live scenario. I’ve found that some of the great recording sounds have too much low end and too little midrange to cut it live. I had a clean sound based on a Super Reverb through the Classic 30 4×12″ cab, that sounded superb when recording. When I took the rig to a live setting, though, it didn’t work at all. A Twin Reverb (cleaner, less midrange) into the B30 2×12″ cab worked perfectly, though. I did the same thing with the AC30 preset – simply switching out the 4×12″ cab for a 2×12″ made it sit just so in the live mix.
The solution is obvious – when creating presets, try to use the same type of setup and circumstances as where you will be using them. If you’re creating a set of virtual rigs for live playing or rehearsals, use a PA monitor at reasonable volume. That will get you in the ballpark. If you’re tweaking sounds for the studio, listening through a pair of studio monitors will help a lot – especially when trying to find sounds that will translate at normal hi-fi listening levels. And obviously, trying the sounds out in their intended environment (i.e. within the musical context) is essential.
The major pitfalls I find with modellers are:
- using too much gain/distortion (because it’s there, and because you don’t feel the amp thump the same way)
- using too much effects (they do sound nice when you play by yourself, but will also make you disappear in a live mix)
- going too fat – I’ve had to tweak all my studio presets for live use, by switching to a 2×12″ cab and different mike (in some cases even replacing the U87 simulation for the trusty 57), to stop them being too bassy and boomy
All of the above will lead to you getting lost in the mix and eating up too much of the sonic space in a band situation. If it sounds a bit too dry, thin and midrangey when you play by yourself, it’s probably right for the band mix 🙂