A lot of the mods and tips posted on this site require soldering, a skill not all of us have acquired. Here’s a quick and dirty ”how to” guide with a few tips and pointers. I’d strongly suggest you get some cable and connectors to practice on, before you start working on your guitar. Likewise with effects pedals – find an old radio or something similar (with normal-sized, not surface-mount components) which you can use to safely practice both desoldering/removing components and soldering in new ones.
Tools
There’s a tool for every job, and soldering is no exception. You need several things, actually.
First off – the soldering iron. It doesn’t have to be a fancy soldering station, but it’s nice to have one. Gadgets, gadgets… At the minimum get a small (at least 15w) soldering pencil with a small tip – you don’t want a big tip for soldering components on a pcb, trust me.
What’s next? Ah, solder. You want a 60/40 mix of tin and lead, in a reasonably thin gauge. I use 0,56 mm (24 swg) for most jobs, depending on the amount of solder needed. For really big jobs like speaker cables I fold it several times (mimicking a thicker gauge). It’s a balance thing – you don’t want to have to apply heat for more than 2-3 seconds, and in that time you want to flow enough solder to complete the joint. A thicker gauge will flow more solder, but for small jobs like pedal modifications the thinner gauge works better, IMO. Anyway, solder wire is usually sold on rolls – a 250 g roll will last you (close to) a lifetime. Keep in mind that the RoHS directive (restrictions on lead used in electronics) means it can be hard to find old-style 60/40 solder – the lead-free stuff works fine too, but won’t flow as nicely and does require a little more heat.
Then you need several things that will make your soldering experience a lot more pleasurable:
- A damp spunge that you use to wipe the soldering iron’s tip clean. You’ll notice that a clean tip makes much better contact and will therefore conduct more heat = faster, cleaner soldering and less component failures.
- A solder sucker is absolutely essential when removing components – it works just like the name implies, by sucking up the excess solder, cleaning the soldering lug/pcb hole so you can fit the new components. Sort of like a reverse bicycle pump. When desoldering pcb pads, a desoldering braid can come in handy, as it doesn’t jerk and recoil when you use it.
- Pliers for cutting wires and component stubs sticking out, and a wire stripper (although I often find myself using a regular pair of scissors, when the wires are too thin/thick for the stripper). Also, you need somewhere to work – a desk with good lighting and – very important – some kind of protective cover for the desk. Cork is great, paper works and plastic is no good. You will drop hot solder on your workbench…
- Finally, although not technically part of the soldering process, a multimeter is invaluable. If you don’t have one, go get one right away – it’s really that useful.
Skills
The first rule of soldering is: heat the parts you’re soldering together, and not the solder itself. The part you’re soldering something to is supposed to get hot enough to melt the solder, and the iron is there to do that job. Once both the part you’re soldering something (for instance a wire) to and the wire is hot enough – and this usually only takes a second or so, if the tip is clean – apply just enough solder to cover the parts. Not more – it won’t stick better if you apply more. Trust me on that one. Then – and only then – remove the soldering iron and let the joint cool off. If you feel the need, you can put an alligator clip on the leg of components that are heat-sensitive. Place it above where you’re going to solder, and the heat will travel into the clip instead of into the component. Just let the clip cool down before you try to remove it…
Quick, decisive action is the order of the day – a good solder joint shouldn’t take more than a total of two to three seconds to complete. Never, ever move the parts you’re soldering until the joint has cooled enough. Don’t reheat to reposition cables etc – you’ll probably end up with a cold solder joint. If you need to redo the joint, heat it, remove the exess solder (with a solder sucker or desoldering braid) and solder again. Practice, practise, practise… Don’t make soldering a $10 Carling switch or an expensive ts-9 pcb your first soldering experience – practise on a prototype board (breadboard) and some resistors instead, then start making your own cables and move on from there. Much cheaper…
Tips and tricks
* Always pre-tin cables. When you’ve stripped the wires that you’re going to solder, twist each wire end so that the strands don’t stick out. Then apply some heat, and give them just a touch of solder – enough to make them shine. This will make them bond faster when you do the actual soldering, giving you neater, more secure solder joints.
* Keep the tip clean. After every solder joint, you should clean off any excess solder from the tip. Use a damp spunge for this purpose.
* Pre-tin the tip – always, but especially if you’re soldering to plugs, pots etc (where the object you’re soldering to is quite large). This will help the heat transfer faster.
* Keep it clean. Not only the tip of the iron, but everything needs to be clean. Electronics experts don’t just wear white labcoats to look cool… Soldering lugs that have grease, fingerprints or oxidation on them will not take the molten solder properly – you’ll end up with a cold solder joint (where the solder have only melted into the wire, but actually rests on top of the surface you tried to solder to). When soldering your guitar pickups’ ground wires to pot casings, I’d recommend you buff the surface up (with wire wool or grit paper) first. The same basically goes for any area you’re going to solder to – it’s only the measures that differ with the size. If they are dirty, solder pads on a pcb can be gently cleaned with an eraser, for instance.
First aid
We all slip from time to time. Some times we mess up worse than others. For instance, I frequently forget that 1/4″ plugs stay hot for quite a while after soldering… But as of today, I’ve only seriously burnt myself once or twice, and I have the scars to remind me not to do that again. If you do burn yourself, don’t waste any time. Set the soldering iron down safely and securely (you don’t want to cause a fire as well), remove any rings from the finger(s) that by now should be starting to throb, and head over to the kitchen. Cool the area you’ve burnt with running water, ice etc for 5-10 minutes (to minimize swelling) and start looking for the first aid kit. Hopefully, it will contain a sterile dressing you can use to protect any open wounds from infections. Seek medical help if needed.
How not to…
Here’s a brand new DPDT switch being ruined in just three quick steps:
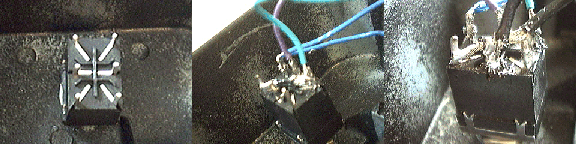
Note the overuse of solder and splaying wire strands that are dangerously close to shorting the neighboring soldering lugs. Basically, this example of bad soldering is right up there with the worst I’ve ever seen. And of course the person responsible didn’t do this to his own pedal… (and no, it isn’t me).