
By popular demand 🙂 here’s a rehashed version of a page from the old site. I’m sorry about the pics – I would love it if they were a bit bigger, but these (lifted from the old site) were the only ones I could find.
Anyway, way back, I bought a Rockcase pedalboard/case, and decided to build a wah plate and raised back row for it. Here’s what happened…
Tools and parts
For this type of project, you need:
- Drill and drill bits
- Jigsaw
- Sandpaper and sanding block
- Spray glue
- Staple gun, screws and odd bits
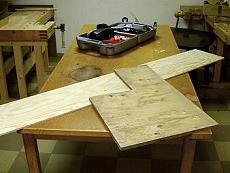
I started at the lumberyard, where I picked up a good-sized piece of 7 mm plywood. It was far bigger than I needed, actually, but that’s what they had in the excess wood bin. I also found a piece of thicker ply, which would come in handy for the wah plate. Lumber yards (or Home Depot, if you’re in the US) almost always have lots of scrap bits of wood that you can get for next to nothing.
Next item was carpet. I could use some black trunk/bass bin carpet, but choose carefully – not all of them will have a tight enough weave to grip the velcro. Bring some velcro to the store, and try before you buy. In the US, there’s 3M Veltex fabric, but I still haven’t found a supply here in Europe. Banzai Music in Germany has velcro sheets ready to order, though. I ordered one for a later pedalboard project (this article was originally posted a few years ago), and it has a really tough backing that works well with spray glue. Mine arrived a bit crinkled, but a quick blast to the back side from a hairdryer cured that just fine…
Wah riser plate
The idea behind a wah plate is to raise the wah silghtly, to help the input plug clear the edge of the case. The holes for the rubber feet also means the plate can connect more securely to the ”belly” of the wah, which helps the pedal stay in place when velcroed to the riser plate.
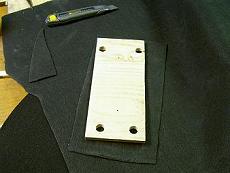
I used the back plate from the wah to outline the size of the wah plate. Don’t make it too tight – you are going to drill four 16mm holes in it (for the rubber feet), rather close to the edge, so you need to leave a little space if you don’t want the edge to break. Mine came out at about 255×110 mm. The plywood needs to be 9-10 mm thick to raise the wah high enough to stop the input cable plug fouling the edge of the case. Obviously, the thickness needed depends on the height of the edge on your particular case, so you might need more or less. In any case you will need the plate to make up the height of the rubber feet, unless you plan on removing them. Also, I drilled and countersank two small holes, to screw the plate into the pedalboard base. But you could of course just use velcro – if you leave the underside of the plate bare, just using enought carpet to wrap around the edges, the self-adhesive male (hook) velcro you use on the bottom of your pedals will stick to the plate as well…
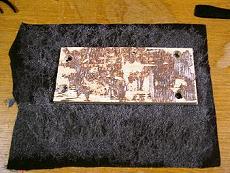
Next came the glue. Spray one side of the wood, normally the side that will be facing up, and let it dry for a minute or so. Since wood is rather porous, much of the glue will sink into the pores – give it a second layer, and wait another minute. Then spray some on the carpet as well (after checking which side is the inside, of course) and you’re ready to go to work. I gently set the piece in place, and turned it over to push any bubbles out. Once the two are properly joined, spray the back side and remaining carpet, wait a minute and start folding. I aligned the carpet so that one edge ended right down the middle of the back side, and then when I folded the other side around, I used a sharp boxcutter knife to cut along the edge, making the two ends meet without overlapping. I also used a staple gun, to secure the carpet round the edges of the plate – this carpet will not come loose…
Back row riser
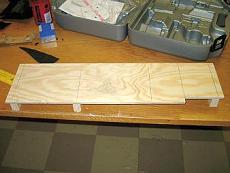
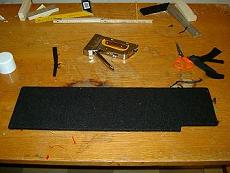
Next, it was time to do the main piece – the actual pedal riser. I had all the measurements jotted down on a piece of paper, so I only had to transfer them to the plywood sheet, and start sawing. In the pic, you can see the cutout section I made to stop the wah pedal clash with the riser.
I had already calculated the clearance needed underneath, and stuck to it religiously. There would be little point in going through all this trouble, just to realize that the power supply won’t fit underneath the riser… At the same time, you need to factor in the internal height of the case, to make sure the pedals in the back row will actually fit with the lid closed. The carpet adds a millimeter or so to the thickness, which will have to be taken into account as well (which is also why I decided to make sure the carpet didn’t overlap – the tolerances were a little too tight on this project).
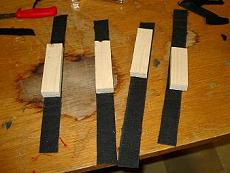
For the feet, I used a 2 cm thick plank of wood, cutting it into 40 mm wide strips which was then turned on their sides, creating feet 40mm high and 20mm wide. To make them perfectly equal, cut them slightly big (which will leave the pencil mark in place), clamp them together and shave them down to the right size. I used regular wood rather than plywood, since plywood splits too easily when you drive screws into it from the side. The length of the feet were kept 2 cm shorter than the riser depth, so I could neatly route cables along the edges of the riser. The feet are shown here during the carpeting phase – note that one of them is shorter than the others, as it’s meant to go under the cutout section.
For a different, much later, back row riser project, I used plywood for the feet instead of regular wood. I simply cut their shape out and stacked/glued together the pieces to the desired height. Then I could use screws the regular way (since the ply was the regular way up).
After drilling and countersinking the holes to attach the feet (and punch-marking/pilot drilling the feet as well), it was time to glue the carpet on to the main riser. Again, I sprayed the topside of the wood first, as well as a strip in the middle of the carpet, and then joined the two. After spraying the back of the riser, and the remaining carpet, I started folding. Think of it as gift-wrapping – you fit one of the flaps, and then pull the other to meet it. Once you have cut the fabric so it doesn’t overlap, you have to fold the edges in. The cutout presented something of a challenge, but it worked out ok in the end, I think.
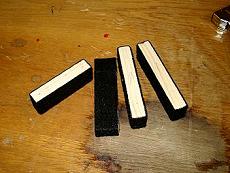
Next, the feet needed carpet as well. To be honest, they didn’t need carpet – I chose to carpet them to make them look the same as the board. But you could just as well paint them black if you wanted. Anyway, I decided to only cover the sides, to keep the height correct. I cut strips of carpet to roughly the correct width (always give it a little extra – you can always trim the excess later, but you can’t add width as easily), and proceeded to glue them. Once again, the technique was the same: glue on one side and on a bit of the carpet, attach the two so the carpet ”sits” right (as in the earlier pic). Then add glue to the rest, fold around, and cut the excess off.
All done!
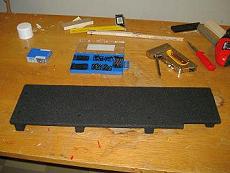
Here’s the finished article – I used black screws to join the riser and feet together (and yes, the holes were a bitch to locate with the carpet in place). On the underside of the feet, just add some stick-on hook velcro to attach the riser to the board. Of if you want even more security you can use small L-brackets and screws to secure the feet to the board.
Well, that’s it. If you want to see the board fully loaded, go to the ”Effects overview” page. That board/case served me well for quite a few years. I did have to raise the feet of the back row riser once, when I switched to a different power supply. For that, I simply stuck thin strips of plywood between the feet and the underside of the riser, and used slightly longer screws when I put the feet back on. The pedalboard in question is found in the ”old setups” section a bit down that page. Also, the current setup (at the top of that page) has the board with the second riser I mentioned briefly in this article.