A while back, Sanyo released the Pedal Juice rechargeable battery pack for guitar pedals. I believe it has since been discontinued, but there are others out there (Pedaltrain has one, IIRC). Anyway, this is a good idea. You won’t have to search for a mains outlet where you place the pedalboard on stage, and you won’t get any hum from AC ripple (more about that here), as the power source is a battery. But there are drawbacks, of course. For one, the cost – the Pedal Juice did cost more than quite a few power supplies (even ones with isolated outputs, which it doesn’t have).
But if the battery pack idea tickles your fancy, you can easily put one together yourself. Here’s how to do it:
A little math

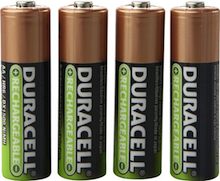
Rechargeable AA batteries are rated at 1.2 volts, rather than 1.5 volts, so by combining 8 of them in series (8×1.2), you should have a steady 9.6 volts – perfect for guitar pedals. And these days, NiMH rechargeable AA batteries can have a capacity of up to 2500mAh, which technically could power a 250mA pedalboard for 10 hours. In the real world, you will probably get less than that (you’ll have to recharge when the voltage drops below useable figures, rather than when the batteries are completely drained). But with a fairly small pedalboard, you should be able to get enough for a day’s playing, at least.
Also, get a quick charger (you can often get a combo pack with charger + 4 batteries). As the charger usually only holds 4 batteries at a time, you’ll have to run two cycles to charge all 8 batteries. You do not want to have a charger that needs 10-12 hours for each quartet. Inevitably, you will forget to keep the batteries charged, and end up having to panic-charge while you’re packing your stuff for a gig…
There is one caveat, though, and it is an important one. Remember that batteries are unregulated power sources, so their output voltage will vary with the load. Although the batteries say 1.2 volts on them, that is usually measured under load. With no load, or a low load (such as a smallish board of guitar pedals), the combined voltage might be a little higher than the 9 volts we’re aiming for. So make sure your pedals can handle up to 12 volts – the voltage you’d get from 8 alkaline AA batteries. Most pedals will be fine, but a few will actually die if you go above as little as 10 volts.
To get more control over the voltage, you can use AA battery dummies (to be able to use 6 or 7 batteries in an 8-battery holder). If you find the voltage to be too high, just pop a dummy in to lower the voltage by 1.2 or so volts.
Putting it together

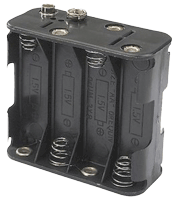
To combine the batteries, you need a battery holder. These come in various sizes, so look for one with that fits the number of AA batteries you want to use (normally 8). At the top, there are connectors for a battery clip – the same type you’d find on a 9 volt battery. Those connectors are the output from the battery holder. Keep in mind that the connectors will match a regular 9v battery (the small one is +, and the larger one -) – this knowledge will be vital later.
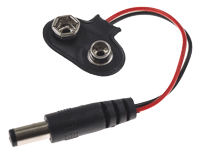
You also need a battery clip and a 5.5×2.1mm DC plug. Get a male plug if you’re connecting directly to a pedal, or want to use a daisy chain cable that starts with a female jack plug. If you’re connecting to a Boss daisy chain (the one that has all male plugs), get a female jack plug instead.

Now for some soldering. Connect the battery clip’s positive (red) wire to the sleeve of the DC plug, and the negative (black) to the center pin. Don’t forget to slide the plug cover over the wires before soldering – it happens all the time 🙂 Also, some shrink tubing over the wires and sleeve of the plug will also help relieve some stress from the wires. You should end up with something like the contraption pictured here.
There are ready-made battery clip -> DC plug cables out there (search for ”emergency battery connector”), but you need to verify how they are wired. For instance, the battery clip => DC plug cable available for the Arduino is wired center positive, so it can not be used. Also, don’t be tempted to use the DC plug => battery clip cables that come with some power supplies. Those are meant to connect to the battery clip in a battery-only pedal, and will also end up center positive when connected to a 9v battery or battery holder.
So if you buy something ready-made, make sure it is designed to clip on to a battery and carry the positive voltage on the outside/sleeve of the plug, with the center pin negative. And make a habit of always using a multimeter to verify where + and – are on the plug, before you connect it to any pedals.
Pros and cons
The advantages of this type of system was covered at the beginning of the article. The Sanyo unit has a power on/off button, but with the DIY method you’ll have to unplug it from the daisy chain to shut the power down. Also, even though modern 1.2v rechargeable AA batteries can carry almost 2500mAh, it’s still a fair bit less than the Pedal Juice, so it won’t last as long. And then there’s the cost. You do need to do a little math first, adding up the cost of the charger, batteries and parts, to see if it’s really worth it.
Also, keep in mind that even though the power from the battery pack has no ripple, it’s still a daisy chain setup. So you will still run the risk of ground loop hum and interaction between pedals – especially if some of your pedals are connected to the amp’s effects loop. If you have to have a second power source for the fx loop pedals, this type of setup will not be worth the effort. It will work best for a relatively small setup – I can definitely see myself using it for my small gig/rehearsal board, but not for the bigger setup.
Parts list
- Battery charger and rechargeable AA batteries
- Battery holder
- Battery clip (for 9v batteries)
- 5.5×2.1mm DC plug
- Optional: 1 or 2 AA dummy batteries, depending on the size of the battery holder and the resulting output voltage under load.